
Red Agent Swarms for Testing Customer-Facing AI Agents
LLM applications have a semi-infinite attack surface, and they are notoriously hard to secure without breaking the user experience.
AI
LLM
AI Safety
This article discusses the purpose of CloudQuery, some of its use cases and a simple Quick Start that can be followed along to get results quickly.
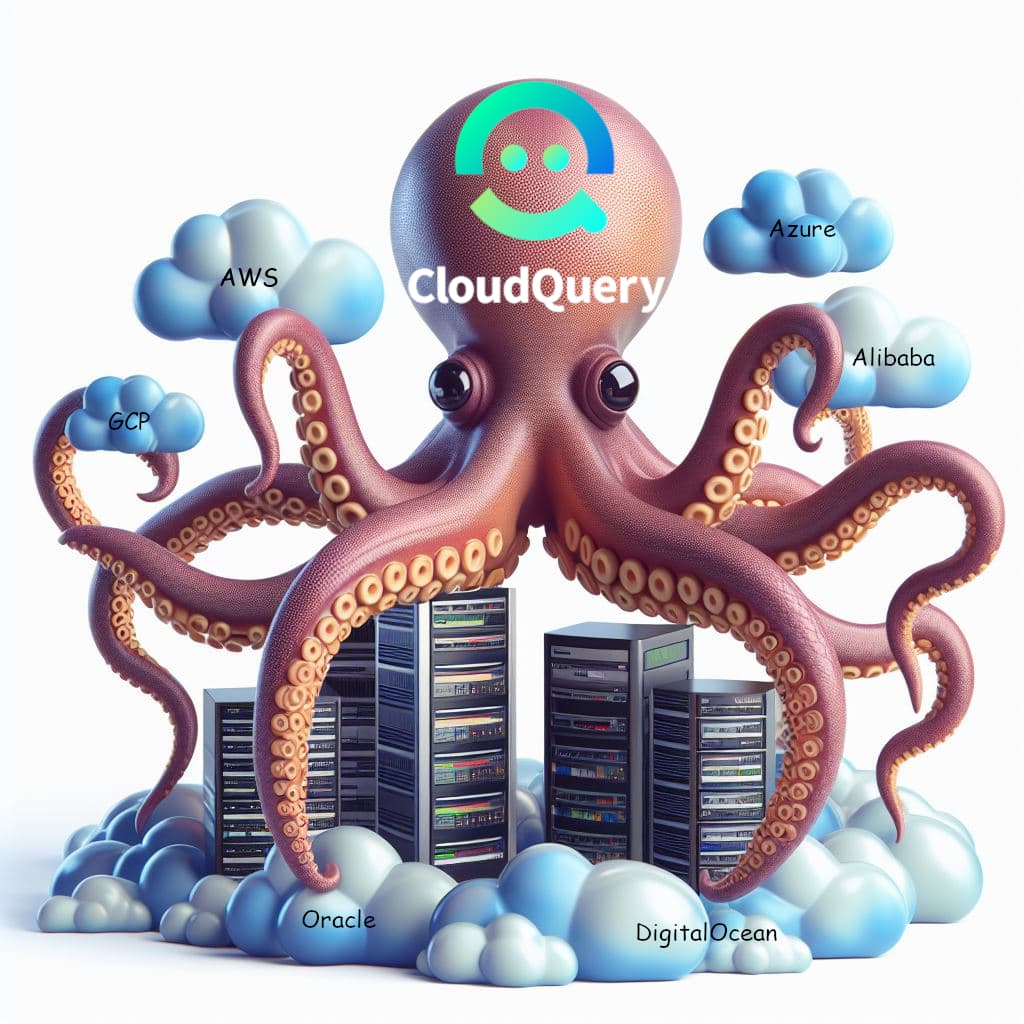
CloudQuery is a data integration framework that is open-source and highly performant. It is designed to help developers extract, load, and transform configuration data from cloud APIs to a variety of supported destinations such as databases, data lakes, or streaming platforms for further analysis.
In other words, CloudQuery is a tool that helps developers sync data between various sources and destinations, transform the data, and visualize it. It supports plugins, destinations, transformations, and visualizations for data lake, security, compliance, and finops use cases.
Its origin is with extracting configuration data from various cloud providers. Today, it supports a variety of additional data sources with many destinations such as relational and NoSQL databases as well as Kafka.
CloudQuery is a versatile tool that can be used for a variety of purposes, including but not limited to:
CloudQuery can help solve the problem of data integration by extracting data from cloud APIs and loading it into a variety of supported destinations such as databases, data lakes, or streaming platforms for further analysis. It can also help with security and compliance by maintaining a number of out-of-the-box security and compliance policies for cloud infrastructure. CloudQuery can eliminate data silos across organizations, unifying data between security, infrastructure, marketing, and finance teams. Additionally, CloudQuery is optimized for performance, utilizing the excellent Go concurrency model with light-weight Go routines. This makes it an ideal tool for running ELT workloads that are compute-intensive and can get expensive.
A very common problem large organizations face, is that they have trouble keeping track of all their cloud assets. Especially in multi-account and multi-cloud environments, maintaining insights into all your resources is cumbersome, as each cloud provider uses their own API/data model. CloudQuery can efficiently load most types of resource configurations across all cloud providers and accounts and therefore provide all the data into a single destination. The data can then be accessed offline (without additional requests to the cloud providers) and therefore provides an excellent point-in-time view into all cloud resources within an organization.
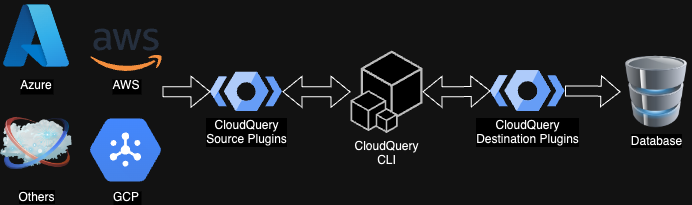
CloudQuery has a pluggable architecture with Source and Destination plugins. Source plugins are used to fetch data from their respective third-party APIs (e.g. AWS, Azure or GCP) while destination plugins are responsible for database migrations and data insertion. The CLI is the end-user interface and manages and integrates Source and Destination plugins.
CloudQuery's architecture is additionally documented in the official documentation.
As part of this blog post there are two quick starts. The first one addresses syncing data from a single AWS account while the second one syncs data from an AWS organizational setup. There are shared steps and distinct steps for each scenario. It is recommended to go through the Single Account steps if you have administrative access to a single AWS account, but no AWS Organization exists, or you have no administrative access to the master account. Go through the Multi Account steps if you have an AWS Organization and have administrative access to the master account.
This quick start is tailored to get one going very quickly syncing data from AWS with a single account into a data store and thus makes the following assumptions:
Architecture Single Account
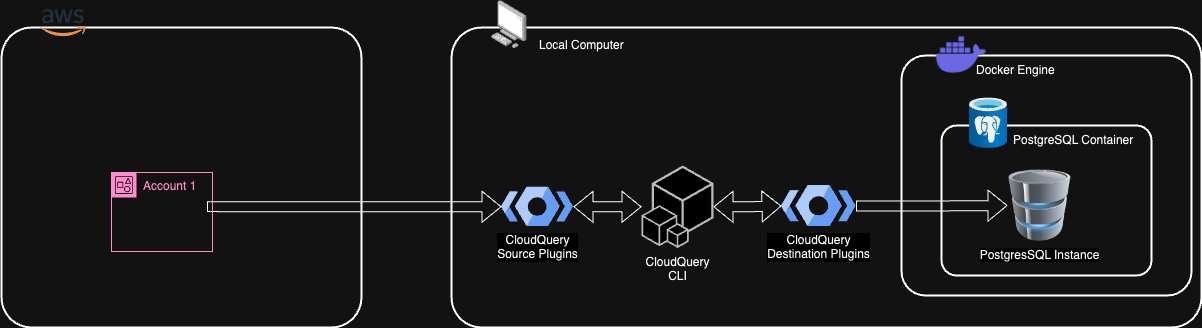
PostgreSQL database is deployed as Docker container. CloudQuery binaries are installed locally. CloudQuery CLI is invoked locally and fetches all cloud data writing to the PostgreSQL database.
This quick start is tailored to get one going very quickly syncing data from AWS with organizational setup into a data store and thus makes the following assumptions:
Architecture Multi Account
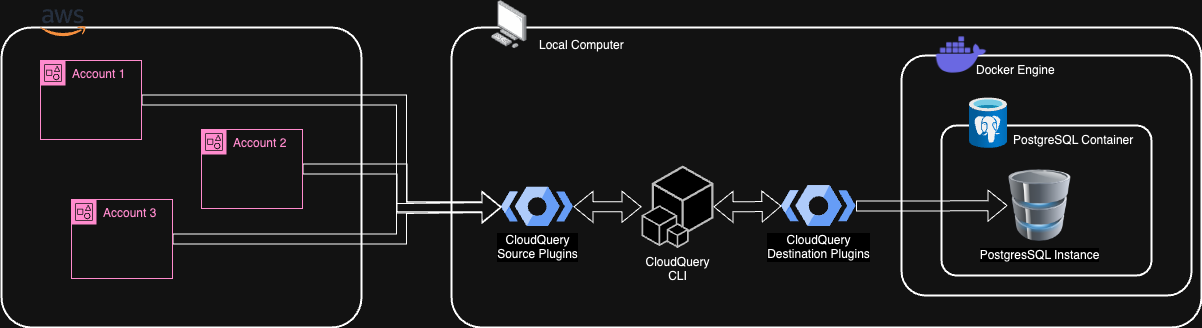
PostgreSQL database is deployed as Docker container. CloudQuery binaries are installed locally. CloudQuery CLI is invoked locally and fetches all cloud data writing to the PostgreSQL database.
Applies to Single Account and Multi Account.
<profile_name> in following example text)Applies to Single Account and Multi Account.
This step prepares a local directory and sets up some basic configuration
quick-start-cloudquery.env with the following content:DB_USER=postgres
DB_PASS=postgres
DB_HOST=localhost
DB_PORT=5432
DB_NAME=postgres
PROFILE_NAME=<profile_name>
MEMBER_ROLE_NAME=<member_role_name> # omit for Single AccountNote: The environment variables given as postgres in this example can be set to any alphanumeric value you want. The <..._name> placeholders must be replaced with the actual values from Prerequisites and Quick Start.
.env file as environment variables.export $(grep -v '^#' .env | xargs)NOTE: You will need to use the same shell for all other command in this Quick Start (otherwise come back to this command and re-execute).
Applies to Single Account and Multi Account.
This step will set up a PostgreSQL Docker container and configure a database within using Docker Compose.
docker-compose.yml in your project directory with the following content:services:
postgres:
image: postgres:latest
environment:
POSTGRES_DB: ${DB_NAME}
POSTGRES_PASSWORD: ${DB_PASS}
POSTGRES_USER: ${DB_USER}
ports:
- '${DB_PORT}:5432'
volumes:
- db:/var/lib/postgresql/data
volumes:
db:docker-compose --env-file .env up -d.env file.This step prepares CloudQuery to interact with the cloud provider (here: AWS) to fetch the relevant data and write it to the database.
Setup CloudQuery Configuration Single Account
Applies to Single Account only.
cloudquery.yml in your project directory with the following content:kind: destination
spec:
name: 'postgresql'
registry: 'github'
path: 'cloudquery/postgresql'
version: 'v7.1.6'
pk_mode: cq-id-only
write_mode: overwrite-delete-stale
spec:
connection_string: 'postgresql://${DB_USER}:${DB_PASS}@${DB_HOST}:${DB_PORT}/${DB_NAME}?sslmode=disable'
---
kind: source
spec:
name: 'aws'
registry: 'github'
path: 'cloudquery/aws'
version: 'v22.19.2'
destinations: ['postgresql']
deterministic_cq_id: true
tables:
- aws_ec2_instances
- aws_s3_buckets
spec:
accounts:
- local_profile: '${PROFILE_NAME}'Setup CloudQuery Configuration Multi Account
Applies to Multi Account only.
cloudquery.yml in your project directory with the following content:kind: destination
spec:
name: 'postgresql'
registry: 'github'
path: 'cloudquery/postgresql'
version: 'v7.1.6'
pk_mode: cq-id-only
write_mode: overwrite-delete-stale
spec:
connection_string: 'postgresql://${DB_USER}:${DB_PASS}@${DB_HOST}:${DB_PORT}/${DB_NAME}?sslmode=disable'
---
kind: source
spec:
name: 'aws'
registry: 'github'
path: 'cloudquery/aws'
version: 'v22.19.2'
destinations: ['postgresql']
deterministic_cq_id: true
tables:
- aws_ec2_instances
- aws_s3_buckets
spec:
org:
admin_account:
local_profile: '${PROFILE_NAME}'
member_role_name: '${MEMBER_ROLE_NAME}'Explanation:
The configuration consists of a multisection YAML document with the first section specifying the destination plugin configuration and the second section specifying the source plugin configuration. It is possible to split those into individual YAML files, but here we keep them combined for simplicity.
Detailed information about the individual parameters can be found here for source and destination plugins.
With this given configuration, we are instructing CloudQuery to read (source) data using the AWS plugin from the AWS cloud provider and write (destination) that configuration data to the local database specified by the database URL using the PostgreSQL plugin. Specifically, we are set up to read data only from AWS Elastic Compute Cloud (EC2) Instances and AWS Simple Storage Service (S3) buckets as per the tables configuration.
Additionally, given the configuration for organizations (spec → org) with local SSO profile and member (child account) roles, we are telling CloudQuery to retrieve all accounts within the organization and read data from all member accounts that have permission to assume the given member role.
Applies to Single Account and Multi Account.
This step describes the actual usage of the CloudQuery CLI and how to sync data from the source to the destination.
aws sso login --profile ${PROFILE_NAME}This is required, because CloudQuery CLI requires an active SSO session. If your SSO session has expired, you would get a generic error about failure to retrieve AWS credentials.
cloudquery sync ./cloudquery.yml --no-log-file --log-format json --log-console --telemetry-level none --log-level infoThis command will perform the sync using the prepared configuration and outputs JSON formatted logs to the console.
NOTE: CloudQuery CLI and plugin logging is deliberately verbose on info level, but can be overwhelming when looking at it for the first time.
The sync operation will take some time, especially if there are a lot of resources and accounts in the AWS organization. It also depends on the internet connectivity and processing power of the local machine, as there tends to be quite some data transferred, processed and written to the destination.
NOTE: In case you see errors such as AccessDenied: User: xyz is not authorized to perform: sts:AssumeRole on resource: arn:aws:iam::111122223333:role/<member_role>: This indicates that the specified role does not exist in the target account or cannot be assumed. This may be intentional and depends on how your AWS Organization is set up.
Applies to Single Account and Multi Account.
This step gives some guidance on how to review the data that has been synced with the previous step.
select * from pg_catalog.pg_tables where schemaname = 'public' order by tablenameThis query should return some records: one with tablename equal to aws_ec2_instances and the remaining with tablename starting with aws_s3_bucket*. The reason for AWS S3 bucket having multiple tables is because its data is distributed across the main table aws_s3_buckets and its child tables as explained here.
NOTE: In case you do not see all the tables as outlined in the documentation, it may be that there was no data returned by the API for those and thus the tables were not created.
select * from aws_ec2_instances;
select * from aws_s3_buckets order by name;
Each query should return results. Inspect the results as necessary to learn more about the resources in the AWS organization.
Optional: order the results by accounts with the following queries:
Applies to Multi Account only.
select * from aws_ec2_instances order by account_id;
select * from aws_s3_buckets order by account_id, name;With this Quick Start, we have built a simple data extraction PoC for a few AWS resources for a very specific, but not uncommon, use case involving an organizational multi-account setup in AWS with SSO. CloudQuery uses a locally configured SSO profile for the organizational master account to fetch all member accounts and assume the specified role in those member accounts to retrieve the relevant cloud resources. Having a meaningful setup with, ideally, dedicated roles in the member accounts is essential for multi-account environments. This also requires a good strategy for managing and rolling out changes across all accounts. Be it as it may, given the AWS side of things is set up correctly, there is typically less effort to configure CloudQuery to perform sync operations correctly. In terms of architecture, we have seen that there are not many resources involved. While everything for the PoC (except the cloud resources) was created locally, we can easily see any or all resources being moved to on-premise or cloud data centers.
What can we do from here?
This article barely touched the surface of what can be done with the data ingested through CloudQuery. In fact, following the Quick start, other than having your cloud data in a central data store, you have not accomplished a lot yet. While you have all your cloud resources normalized per each cloud provider, meaning that all resources for each resource type are available in their respective tables, there still is no visibility into all your resources of a specific type (e.g. virtual machines) yet across multiple cloud providers.
To truly unlock the potential of the cloud data available through CloudQuery or to just improve the process of syncing data with CloudQuery, here is a list of suggestions readers may explore:
Read more about the latest and greatest work Rearc has been up to.
LLM applications have a semi-infinite attack surface, and they are notoriously hard to secure without breaking the user experience.

Recently, articles surrounding the supposed dangers of an open source abliteration tool called Heretic, along with legal notice being served to its creator, have inspired me to speak out for two reasons.
A step-by-step guide to deploying a Databricks workspace with Private Service Connect (PSC) on GCP and common pitfalls to avoid.

A deep dive into Databricks Foreign Catalogs for Glue Iceberg table access
Tell us more about your custom needs.
We’ll get back to you, really fast
We will evaluate your query and respond within 2 business days.
Kick-off meeting
We will schedule a quick meeting to further understand your use case and start working toward a solution together!